Before you begin
Plans: Professional and Enterprise
Overview
The following procedure demonstrates how to create a basic purchase order from the very beginning, starting at the purchase planning board right through to receiving the line items. An overview of each tab within the Purchase Order module is also provided.
Steps:
1. Select Purchasing. The purchasing planning board is opened by default.

Purchasing Planning Board overview:
The Purchasing Planning Board is where purchase requests, received RFQ’s, and low stock items are automatically populated. Users with purchasing permissions can use the purchasing planning board to evaluate their next purchases. Items listed here are approved, and moved along through the purchasing process, or removed entirely.
2. To view items at other sites, select the site from the dropdown menu in the Purchasing Planning Board

3. The purchasing process can begin from the purchasing planning board, or by selecting Purchase Orders, and New

The following procedure will begin at the purchasing planning board.
4. Items without business information attached to them appear under the No Associated Supplier header. Items with business information attached to them appear under their associated supplier.
Note: An item must be associated with a supplier to make a purchase

5. To add a supplier to an item click Select Supplier

6. Select the Business, Business Type, add a Supplier Part Number, and Catalog. Select Display as primary business to display the business at the top of the parts record.

7. Select Purchasing to configure the purchasing settings for the part.
- Selecting This is my preferred vendor, automatically adds the business to the RFQ, or any purchase requests for the part and supplies item.
- Selecting Send RFQ when lowstock occurs, automatically sends an RFQ to this business when low stock occurs.
- Selecting Add stock location as shipment address to RFQ, automatically adds the stock location to the RFQ when low stock occurs.
- Adding a value to the Reorder Quantity field, automatically adds this value to the quantity requested when low stock occurs.
- Adding a value to the Number of days for reorder delivery field, adds this value to the date that the RFQ is generated. The resulting date is used to define the expected delivery date for the RFQ. This date is only added to the RFQ that is generated automatically when low stock occurs.
Click OK to complete.

8. Once an item has an associated supplier it can move to the purchase order form.

9. To remove items from the purchasing planning board, check off the items, and click Delete

10. The purchasing planning board groups items by supplier. Items with the same associated supplier can be added to the same purchase order. To create a purchase order, check off the items, and click Generate PO

Purchase Orders
1. Line Items:
11. The purchase order form is in a draft state by default. The purchase order form must have a supplier, line item, quantity, unit price, and any applicable taxes.

12. The Billing Terms (optional) are added by selecting the dropdown menu. The Expected Delivery Date (optional) is added by selecting the calendar, and the Confirmation Number (optional) is added to the empty field.

2. Additional Costs:
13. Additional purchasing costs are added under the Additional Costs tab. It is possible to add a lump sum tax value to the purchase order, by selecting Override tax amount, and entering the amount. The lump sum will override the tax rate for each line item. Shipping costs are added by selecting the shipping type from the dropdown menu, and entering the amount. Notes are optional.

3. General:
14. Click the General. Add Account & Charge Department information by selecting the the drop down menu. Select the suppliers Purchase Currency from the dropdown menu. Note that the purchasing module automatically recognizes the suppliers currency if it is already configured in the suppliers business details. The method of contact is selected from the Send using dropdown menu, and the PO Reference Number is added to the empty field.

4. Shipping/Receiving
15. The Shipping/Receiving tab is where the shipping and billing information is added. The supplier information is populated automatically from the suppliers business details. Select the location that the items will be received to by clicking the Ship To dropdown menu and selecting a facility. Select the billing location by clicking the Bill To dropdown menu and selecting a location. The fields are automatically populated with any information already stored about the asset in the CMMS.

5. Notifications
16. The Notifications tab lists the Users, and User Groups that will be notified of any status changes for this purchase order. The Users and User Groups listed under the notifications tab in the example below were added by default. The user that creates the purchase order, the logistics, and purchasing user groups, and users assigned to an asset in the list of purchase order line items, are added to the notifications tab by default.

17. Users/User Groups are removed from the Notifications tab by hovering the mouse over the user and clicking Delete.
18. Users/User Groups are added to the Notifications tab by clicking New, and selecting the User/User Group.

6. Files
Files are added to purchase orders under the Files tab (optional). Files are not sent to the supplier. All files added to a purchase order are stored internally within the CMMS.
19. To add files, select the file type from the menu, click New, and select the file from your computer.

20. Alternatively, files can be dragged-and-dropped into the files window above.
7. Discussion:
Comments about the purchase order are added under the Discussion tab. Comments are stored internally in the CMMS, and are not sent to suppliers.
21. Click New to add a comment

8. Activity Log:
22. Select the Activity Log tab to view the history of the purchase order (Note: the following example has no history populated in its activity log, because the purchase order status has not changed from its original Draft state)

9. Preview:
23. Select the Preview tab to view an example of the purchase order form

24. Click Save
Send To Supplier:
25. Click Send To Supplier to submit the purchase order

26. There are three options on the following page. The first option is to exit the window without making any changes. The second option is to click Mark as Sent. This option changes the status of the purchase order to On Order, without sending a form to the supplier's email. This is used if the purchase order is generated by some other method, such as fax or telephone. The third option is to send the purchase order form to the supplier's email by clicking Send Email. A comment is required to generate the purchase order.

27. Clicking Send Email, or Mark as Sent changes the PO status to On Order

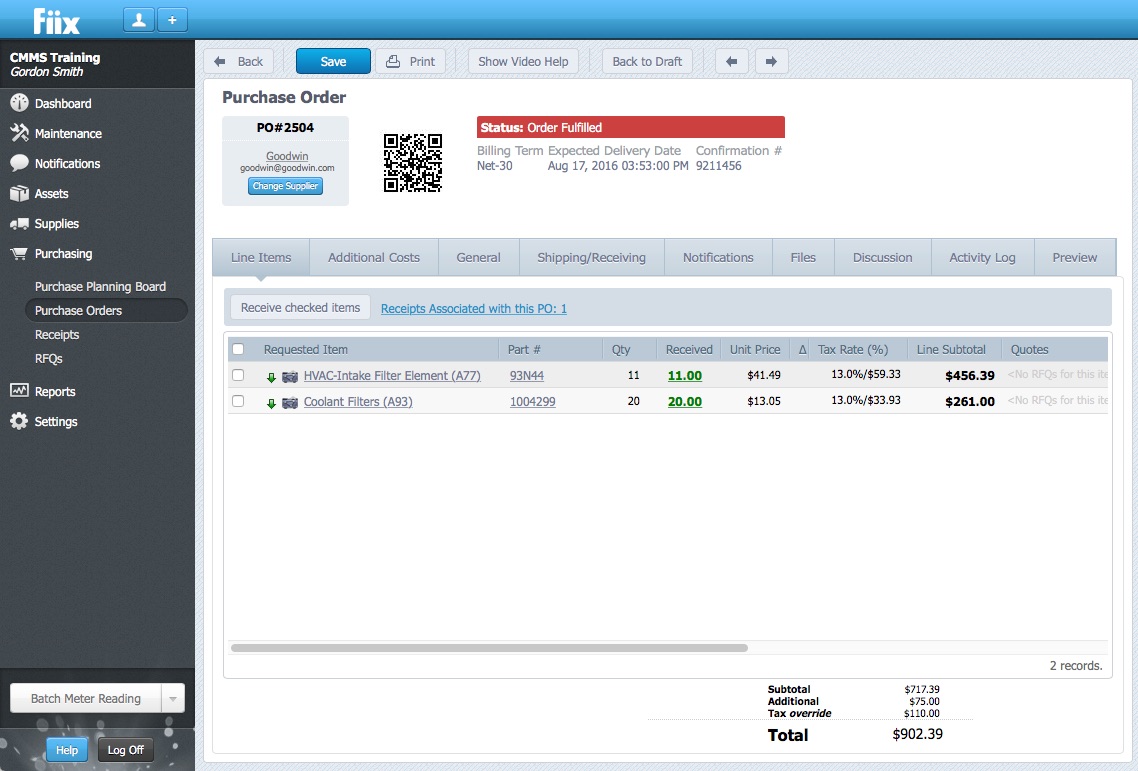
Note:- No changes can be made to the purchase order line items at this point. From this point the purchase order can be set to the status Order Fulfilled, Order Not Fulfilled, or Cancelled.
28. To change the status of the PO, click the Close dropdown menu, and choose a PO status that reflects the state of the purchase order

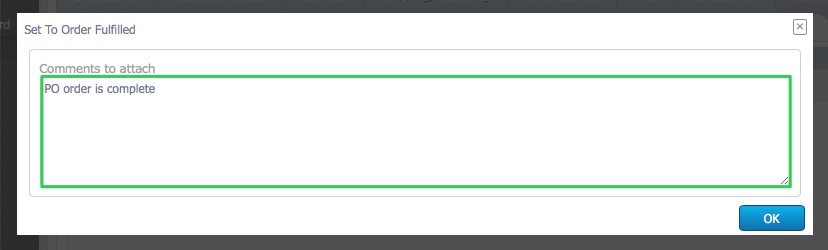
29. Add a comment, and Click OK.
Receive checked items:
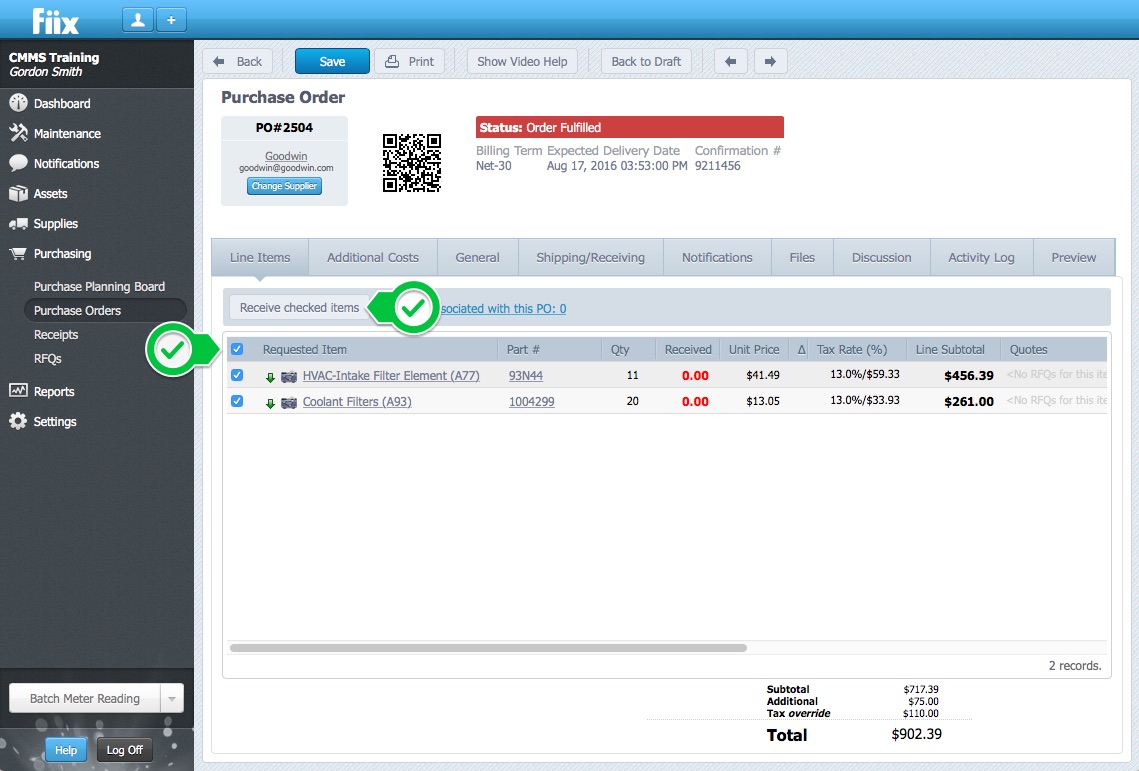
30. To add the purchase order items to the CMMS, select the line items that were received, and click Received checked items.
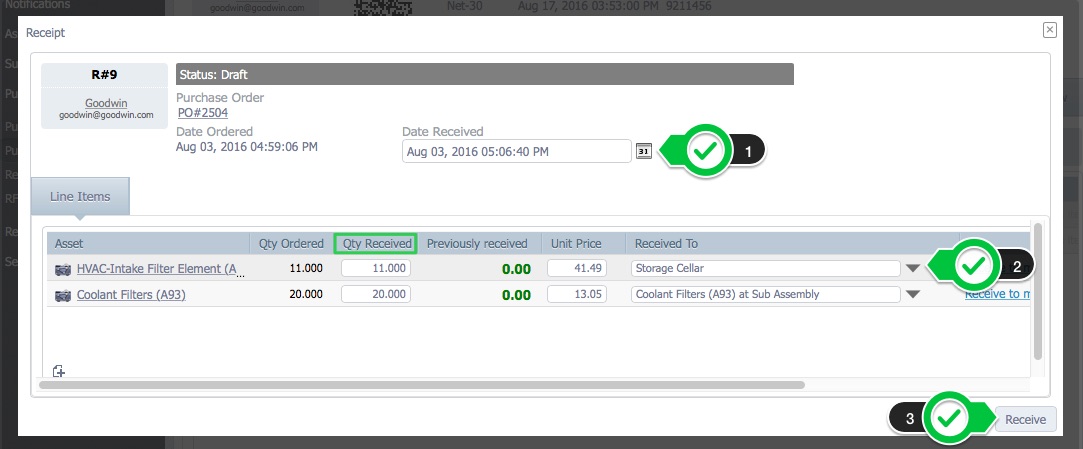
31. Add the Quantity Received, select the Date Received, Received To location from the dropdown menu, and click Receive
The purchase order is now complete